Clean Breathing Changes!
Hi Everyone!
My oh My it has been forever since I have posted. I’m getting antsy. 🙂 I’ve got a million ideas in my mind and already on paper. I think I’m literally BURSTING with information to share. 🙂
So you may be asking, WHY NOT POST THEM? What a GREAT question that is. At the beginning of this year I took some time to evaluate and plan where Clean Breathing is going in 2014 and wow are there some BIG changes coming. I am the kind of person who really has to choose to be Patient. So it’s been hard to sit on this waiting for the proper time for everything to take place. So without further ado here is an overview of the upcoming Changes.
1) New WEBSITE.
This is a REALLY big deal and one I did NOT take lightly. We’ve had many “sites” over the years and have dreamed of owning 1 specific web address. This website has brought me many new friends and I’m SO THANKFUL for each of you however there are so many new people we came to a point where we needed a new platform that could properly handle the number of people coming to the site. I am still considering keeping this web page and linking it to the new website (with my dream web address) so keep checking back for updates on a final decision.
2) New GOAL.
I am PASSIONATE about helping people become a Holistic Ninja. My dad use to always tell me “A day that you don’t learn something new is a wasted day.” I TOTALLY agree. 🙂 This Summer I will begin writing the first of a series of eBooks. These short books will help you live Holistically in every area of your life. It can be overwhelming to think about changing EVERYTHING you know from cleaning products to hair and body products, dental products, holistic remedies and everything else (I know from experience). We want to walk you through step by step and we will be starting by helping change how you Clean. Once you’ve been able to easily and with little to no stress make this change we’ll move on to the next step (eBook). We hope you are as excited about this as we are. 🙂
3) New FOCUS.
Originally this company was founded to provide Cleaning Products (and we hoped more personal products over time) to people who wanted to “STOP RUNNING FROM FUMES” and Chemicals. However my dream has always to just simply share my thoughts and everything I’ve learned with anyone who was willing to hear. 🙂 This new site will be focused on just that, sharing the wealth of knowledge I’ve learned about Living a Holistic Life in every area from Cleaning, to health, to skin care, hair care, carpet care, pet/animal care and EVERYTHING in-between. We will STILL be selling our products for those who were concerned for a second (I’ve already had local customers freak out on me).
4) TIME FRAME.
While I’ve been waiting patiently (or at least trying) we are still a ways out from all of the final changes. We believe that by the end of the summer we will have completely switched over to our new Web Address and will be close to launching our first eBook. While this is all very exciting it could be nerve wracking but I’m choosing calm, peaceful thoughts throughout the entire process.
Thank you ALL for your patience as I am slow in responding at this time due to some big personal changes going on in my life. Thank you also for being the best supporters and most encouraging group of people a blogger could ask for.
With MUCH LOVE,
~Bekah
Beautiful Hair!!!

Strand of Human Hair
What is this? This is a strand of hair under a Microscope. We are excited to share with you some tips for helping your hair be soft, healthy and beautiful. Keep checking back we’ll be posting the full post soon.
Spider’s …BE GONE!!
For those who know me, know I HATE spiders. As long they remain OUTSIDE it is possible for us to live peaceably. However, the very moment I see one in my home the battle is on. Now before anyone gets upset at me please understand that I know spiders are useful and blah blah blah but once they invade my territory I have EVERY right to enjoy removing them from my space.
Did you know that spiders HATE peppermint oil? Yup! What’s even better is to know why. The peppermint oil actually burns them ….to death. Oh man you haven’t lived until you’ve watch joyfully as an intruding spider is burned to death by peppermint oil (Insert evil smile and laugh here). It is a sight and makes up for the near heart attack they just caused you.
I’ll never forget the first time I used my “Spider..Be Gone” recipe. I was face to face with a wolf spider and it was determined to live through the torture of the solution I had made. You must know that I am DETERMINED. I don’t back down and “give up or give in” is NOT in my vocabulary. This sucker was GOING TO DIE. Naturally I did the only reasonable thing. I grabbed my bottle of Peppermint oil and after knocking it to the ground I poured straight oil on it. If only I had recorded this amazing scene on my phone. It ROCKED! This big bad wolf spider was desperately trying to get away….to no avail. After about 2-3 minutes of slow burning torture it was dead and I had won the battle in my home.
I sent a message to all the spiders that I am not a force to be reckoned with. So are you ready to be feared by spiders? Here is my recipe, it’s been an essential part of our home for the last 6 years and I hope it will be for you too.
Supplies:
- Peppermint Oil (100%pure essential oil)
- Vinegar (Organic)
- Water
- Spray Bottle
Directions:
In your spray bottle (I use 30 oz bottle) place half bottle of water, 1/8 cup vinegar and 15-20 drops of Peppermint Oil. ( I go with 20 because I like it strong)
WARNING: Essential oils are very strong as they are in high concentrated quantities. PLEASE do not get near eyes and mouth. Keep away from children.
Enjoy Your Hunt,
~The Spider Killer
Confessions of an ACV-aholic
 Slowly opening the bottle I slide a glass toward me and pour ever so carefully a small but impacting amount of Bragg Apple Cider Vinegar (ACV). The smell has already reaches my nose and I am mentally preparing myself for whats next.
The MOMENT I choose to drink ACV I have enlisted the help of the most powerfully effective fighter there is. Yes! I have called for help and my infection fighting, tactical warrior, Ninja Master ACV has come to save the day again. But as with any super hero/Ninja fighter/Warrior it’s kind of messy. When a Super Hero arrives on the scene there is sure to be some broken buildings or cars – Casualties per se. The moment when the ACV is moving to the back of your mouth, down your throat and into your stomach is no different. Imagine this, Your Ninja ACV slides down without warning to the ugly infection attacking you. Ninja ACV immediately goes into action. A few mutual round house kicks are thrown right there in your throat and you’re confident death must be near. Finally your Ninja ACV delivers the final KNOCK OUT BLOW. At first you hated the Ninja it’s oh so painful and then when the intial pain is gone and you are feeling better you are so thankful you took the plunge to call on your Infection fighter. It’s not fun to say the least and THIS ACV-aholic cringes at the thought of drinking it undiluted.
Yes! Yes! I know how can I say all this and endorse it so often. Well maybe I should start by telling you why I drank it. See I woke up not feeling well one day. I do all my Holistic Living tricks…to no avail. My breaking point was after 3 days when it felt like I was swallowing Ninja Stars (NO I’M NOT BEING DRAMATIC) 😉 I knew on day 1 what I should do but….did you read paragraph 2? Seriously, I was wimping out. Finally I did it and within hours I was 50% better. By day 2 of drinking straight ACV the pain in my throat and ears was barely noticable. I’m still (day 4) drinking it for continued healing but oh the pain I could have saved myself.
What is my point? I proudly proclaim to be an ACV-aholic but I never said I loved the taste or smell 🙂 Just wanted all our friends to be confident that – It’s not just you.
Happy Holistic Living – Let the Ninja do it’s work.
~ Bekah
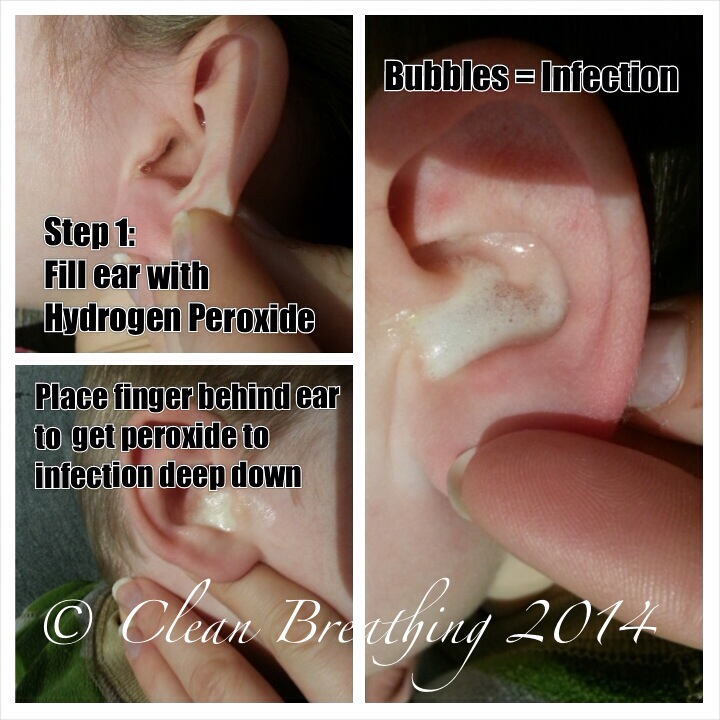
Ear Infection’s
Our family had a blast last weekend as we were able to join our Church family in the local Christmas Parade. It was the first time we’ve ever been in a parade and because of my lack of loving the cold our children have never even been to a parade. So I did all I could to prepare them all for the freezing cold weather. Layer upon layer of clothing, hats, gloves….the list goes on. Now when it’s all said and done I have a child with a cough (See “Breathing Treatments” for recipe) and one with an ear infection. This post will show you how to tell if your child’s has an ear infection and excitingly enough it will also heal it at the same time. Here goes 🙂
WARNING: Contact your medical provider and ask if this safe for your child before trying this recipe if there is a ruptured drum or previous ear problems. If you are unsure…please do NOT attempt this!!!
Supplies to gather –
1)Hydrogen Peroxide
2) paper towl (toilet paper…whatever you have)
3) Qtips
4) Small medicine cup for measuring medicine to children.
5) a treat for your child when it’s all over….trust me on this
Now that you have your supplies all gathered here are step by step directions.
Step 1) pour about 2 tsp hydrogen peroxide in the medicine cup fill the remainder with water. (This usually allows me to treat all 5 kids and myself)
Step 2) pour hp (hydrogen peroxide) from the medicine cup into your child’s ear. You will fill the ear canal until hp is in the outer portion of the ear (see picture)
Step 3) place your finger behind ear (see picture) and press gently. Rubbing behind the ear will help the hp get down in the ear canal and treat even the deepest of infections.
NOTE: your child will complain. It is cold and uncomfortable…not painful. Your child will hear bubbles in their ear ….this is when you will begin to see white bubble coming up. (If your child’s is in pain STOP immediately and get hp out of the ear and see your family practitioner.)
4) Allow the hp to sit in your child’s ear for 1-2 minutes (as long as they’ll allow you….slowly increasing time every treatment)
5) Place paper towel or toilet paper wrapped up in a thick square on your child’s ear. Have them tip their head so they are laying on the paper towel allowing the hp to drain out of the ear canal. (The child may want to tip their head around so as to be sure it all drains out).
6) Gently Clean the outside of the ear after treatment but be careful not to place Q tip in the ear canal as that can be very dangerous.
7) Repeat on the other side 🙂
8) Repeat entire routine every hour or as often as possible. Continually using this treatment will completely clear up infection.
It is possible to have an infection in one ear and not the other. One of our sons always had bad ear infections after a bad fall to his head. After several months of treatment he almost never has ear infections anymore. This child would be up every night after his accident crying from pain in his ears. TRUST ME THIS WORKS. 🙂
Final thoughts – I HIGHLY recommend using preventative measures. In our home we put “Bragg Organic Apple Cider Vinegar” in our ears about 1 time a week or even every other week. ACV (Apple cider vinegar) had SO MANY amazing healing properties. Please use organic as the other stuff does Not work. Use “Bragg Organic Apple Cider Vinegar with the Mother” The mother (floating stuff on bottom is what has all the good stuff).
Let us know if you use this and share your testimony here with others. 🙂
Breathing Treatment’s
One thing that is so hard to watch as a parent is your children struggling to breathe and/or going into coughing fits.
Clean Breathing began because one of our sons went through this every time we cleaned. Chemically filled toxic cleaning product were causing our son to not live life to its fullest. So by wisdom from the Lord Clean Breathing cleaning products were created.
This remedy however is for those nasty croupy type coughs that we or our children can get. They are not fun and if not treated quickly can lead to many sleepless nights and miserable days. Our goal is to help you get well soon. So here goes.
Supplies needed:
– Large glass bowl or a microwavable bowl
– Bragg Organic Apple Cider Vinegar with the Mother
– Water
-Large Beach Towel
Directions:
1) Get your bowl and fill it to almost full (but not so much that the water will spill)
2) Depending on the microwave heat the water to almost boiling 3-5 min…maybe longer (the bowl should be too hot to touch. You should need to use oven mitts)
3) Using your oven mitts remove bowl from microwave and place on table (or area where you can easily sit for several minutes)
4) Add about 1/4 cup ACV (Apple cider vinegar). I personally don’t measure I pour until it looks good and smells strong.
5) Place child on your lap facing the bowl. Hold babies arms (so they don’t get burned by hot water or bowl). Older children can sit in chair on their knees with head over bowl.
6) Place a large beach towel over yours and your child’s head (or over your older child) and breathe in the steam from the water and ACV.
7) Try to have your child breathe through their mouth as much as possible…nice deep DEEP breaths. This will help the lungs and help mucus break up.
Try to repeat this treatment every hour but at least as often as possible. The more you do it the quicker you and/or your child will recover.
If you tried this remedy please share here with others your experience.

Baby Diaper Cream
 Ok so I LOVE Olive oil….like I feel like it’s Christmas when I buy it. It will come as no surprise to you over time that I try to use it for everything. 🙂 So I’ve used it for diaper cream but unfortunately it’s moist and doesn’t keep that little bottom dry. I’ve also used corn starch for “baby powder” however while it’s great it’s dry and doesn’t heal skin. What to do…what to do…. so I kept thinking. Our youngest child got a diaper put on that he’s allergic to and he ate something that had unpleasant results. So, in a place of complete desperation I Finally had an idea. 🙂
COMBINE THEM!!!!
Here is the amazing recipe. I did however change the oil because coconut works much better as it worth thicken easily.
1 tablespoon of Coconut oil and 1 tablespoon of corn starch. Mix them together and voila “Better Bottom’s” cream is done. You may need to adjust measurements but the end result should be a thick paste. Let me add, in one night the results amazed even me….and I was totally hooked on both ingredients already. 🙂
Better than Vicks
 Okay so you may or may not have heard, Vicks Vapor Rub does wonders for coughs. How? There are some specific ingredients in this product that aid in the relief of coughing. I absolutely LOVE the idea…and HATE the product. You will find I get radical on my views of ingredients in products. Most are unnecessary and scientifically created chemicals used to give a product a long shelf life…..insert huff of irritation :-\
SO…..I set out to make my own recipe. Now after years of successful use in our family I want to share it with YOU. Here goes but PLEASE take time to tell us if you use it and how it worked for you family.
Shopping List
1) Coconut oil. I highly recommend going with Unrefined and organic but I understand that financially that is not always possible. Go with the best brand you can afford. (You can use Olive Oil, however, the scent of your rub will change greatly and it does not blend as well with the essential oil we will be using. It will do in a pinch though but don’t store it for very long.)
2) Eucalyptus Essential oil. Again I think it’s obvious I’m going to recommend the best organic essential oil you can get but if you must be frugal the very cheapest essential oil I would recommend is from Now Foods. (I am not in ANY way recommending Now Foods essential oils as they are at the bottom of my “in a pinch” list but just providing options for you). 🙂
3) Glass Jar. Essential oils can latch to plastic and be transferred to anything else placed in that container. It is wise to always use glass when working with essential oils so you can easily wash and reuse the container. (I personally still set some of my glass jars aside for use only with essential oils).
4) Ready to Go 🙂
Directions
Place 2 Tablespoons of Coconut oil in your glass jar and add 5 drops of essential oil. BE CAREFUL! Essential oils are very potent and it can be very dangerous if you get them directly into your eyes or ingest them. Please wear gloves and wash your hands well after working with EO (Essential oil). Sometimes we think “I want it to work better so I’m going to add a bit more” RESIST that temptation 🙂 Find a utensil to stir your new “cough foot rub” and mix it all together. You will want to set this utensil aside and use it only for mixing your new EO recipes.
ALWAYS DO A SKIN TEST FIRST! Place a small amount on the skin and let set for several hours. If a reaction occurs discontinue use. Seek medical attention if concerned. Ask your Dr before use if you have seizures or a serious medical condition.
Now grab your kiddo’s feet…or your own feet an place a nice thick layer of your “cough foot rub” all over the bottoms of the feet then place socks (I highly recommend thick ones) on the feet. Note: You’ll want to do this after your child(ren) or you are in bed for the night. Try NOT to walk on your feet after applying foot rub.
(Added 4/21/2014: I forgot to add that we rub some on the chest and on the feet. Generally I do the chest in the day and feet at night.)


